Bulk Add Steps
The Bulk Add Steps feature allows you to quickly create multiple workflow steps by entering them as plain text, one per line. This is ideal for rapidly prototyping workflows, importing steps from existing documents, emails, chat messages or other brainstorming process flows.
Overview
Bulk Add Steps provides a streamlined way to:
- Create multiple steps at once from plain text input
- Import steps from emails, chats, documents, or web pages
- Create phase markers to organize your workflow
- Add alternative branches with grouped options
- Flag steps for review or mark them as new
- Insert steps at specific positions in your flow
Basic Usage
- Click the Bulk Add Steps button at the bottom of the flow editor
- Enter one step title per line in the text area
- Optionally choose where to insert the steps
- Click Next to preview the steps
- Review the preview and click Add Steps to confirm
Simple Example
Collect patient information
Verify insurance
Schedule appointment
Send confirmation email
This creates four sequential steps in your workflow.
Advanced Formatting
Creating Phases
Use a leading # to mark a step as a phase. Phases are high-level organizational units that help structure complex workflows without adding additional complexity.
Bulk Add Syntax: # Phase Title
Example:
# Planning Phase
Gather requirements
Review stakeholder needs
Create project timeline

# Execution Phase
Implement features
Conduct testing
Deploy to production
How it will appear:
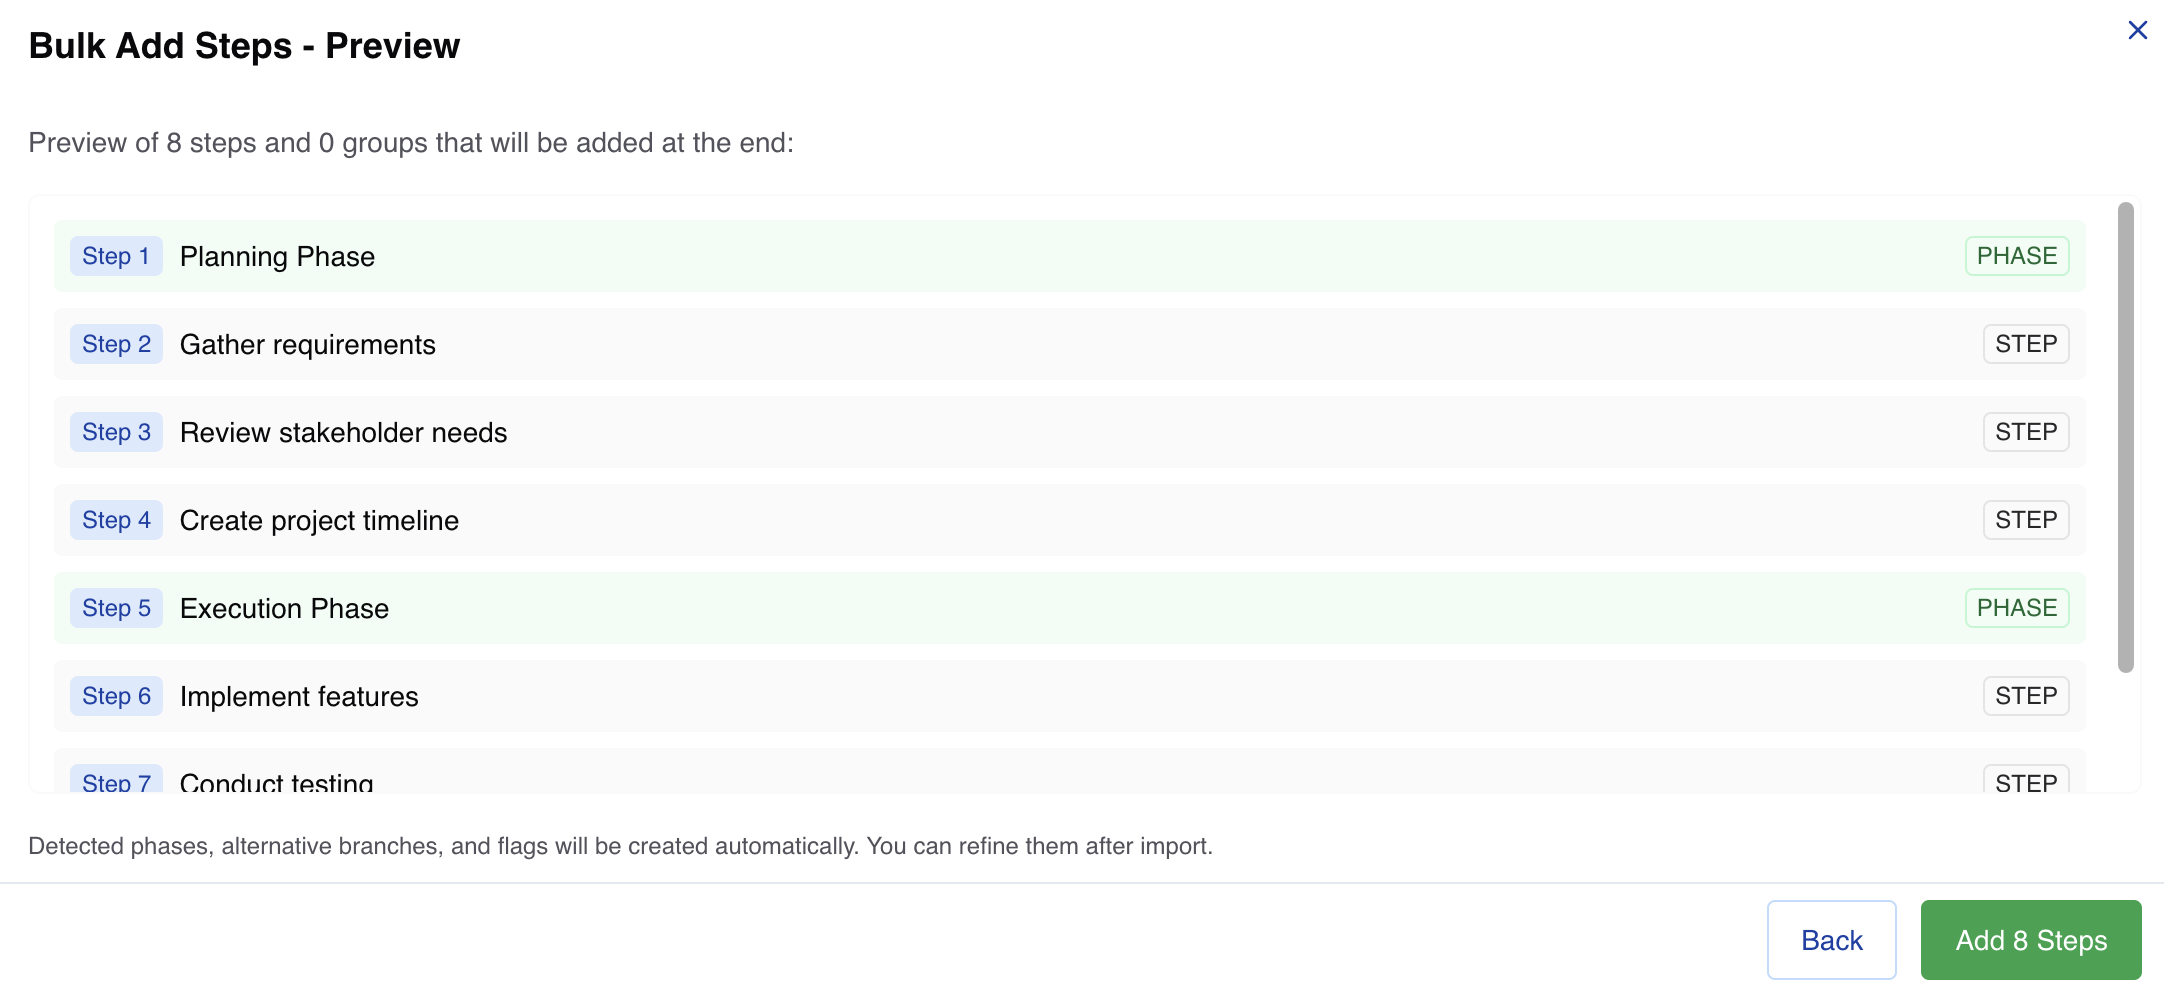
Phases appear with a distinct visual treatment (green background) and help organize your workflow into major segments.
Creating Alternative Branches
Use a leading - (hyphen) to create alternative "sub-steps" beneath a step intended to mark the beginning of a group.
Once added, all groups will be marked as alternative courses, but you will be able to update in the flow editor to one of three options: Alternative, Exception or Repeating.
Bulk Add Syntax:
A step in the flow.
Group Title
- Alternative Option 1
- Alternative Option 2
- Alternative Option 3
A step following the group.
How it will appear:
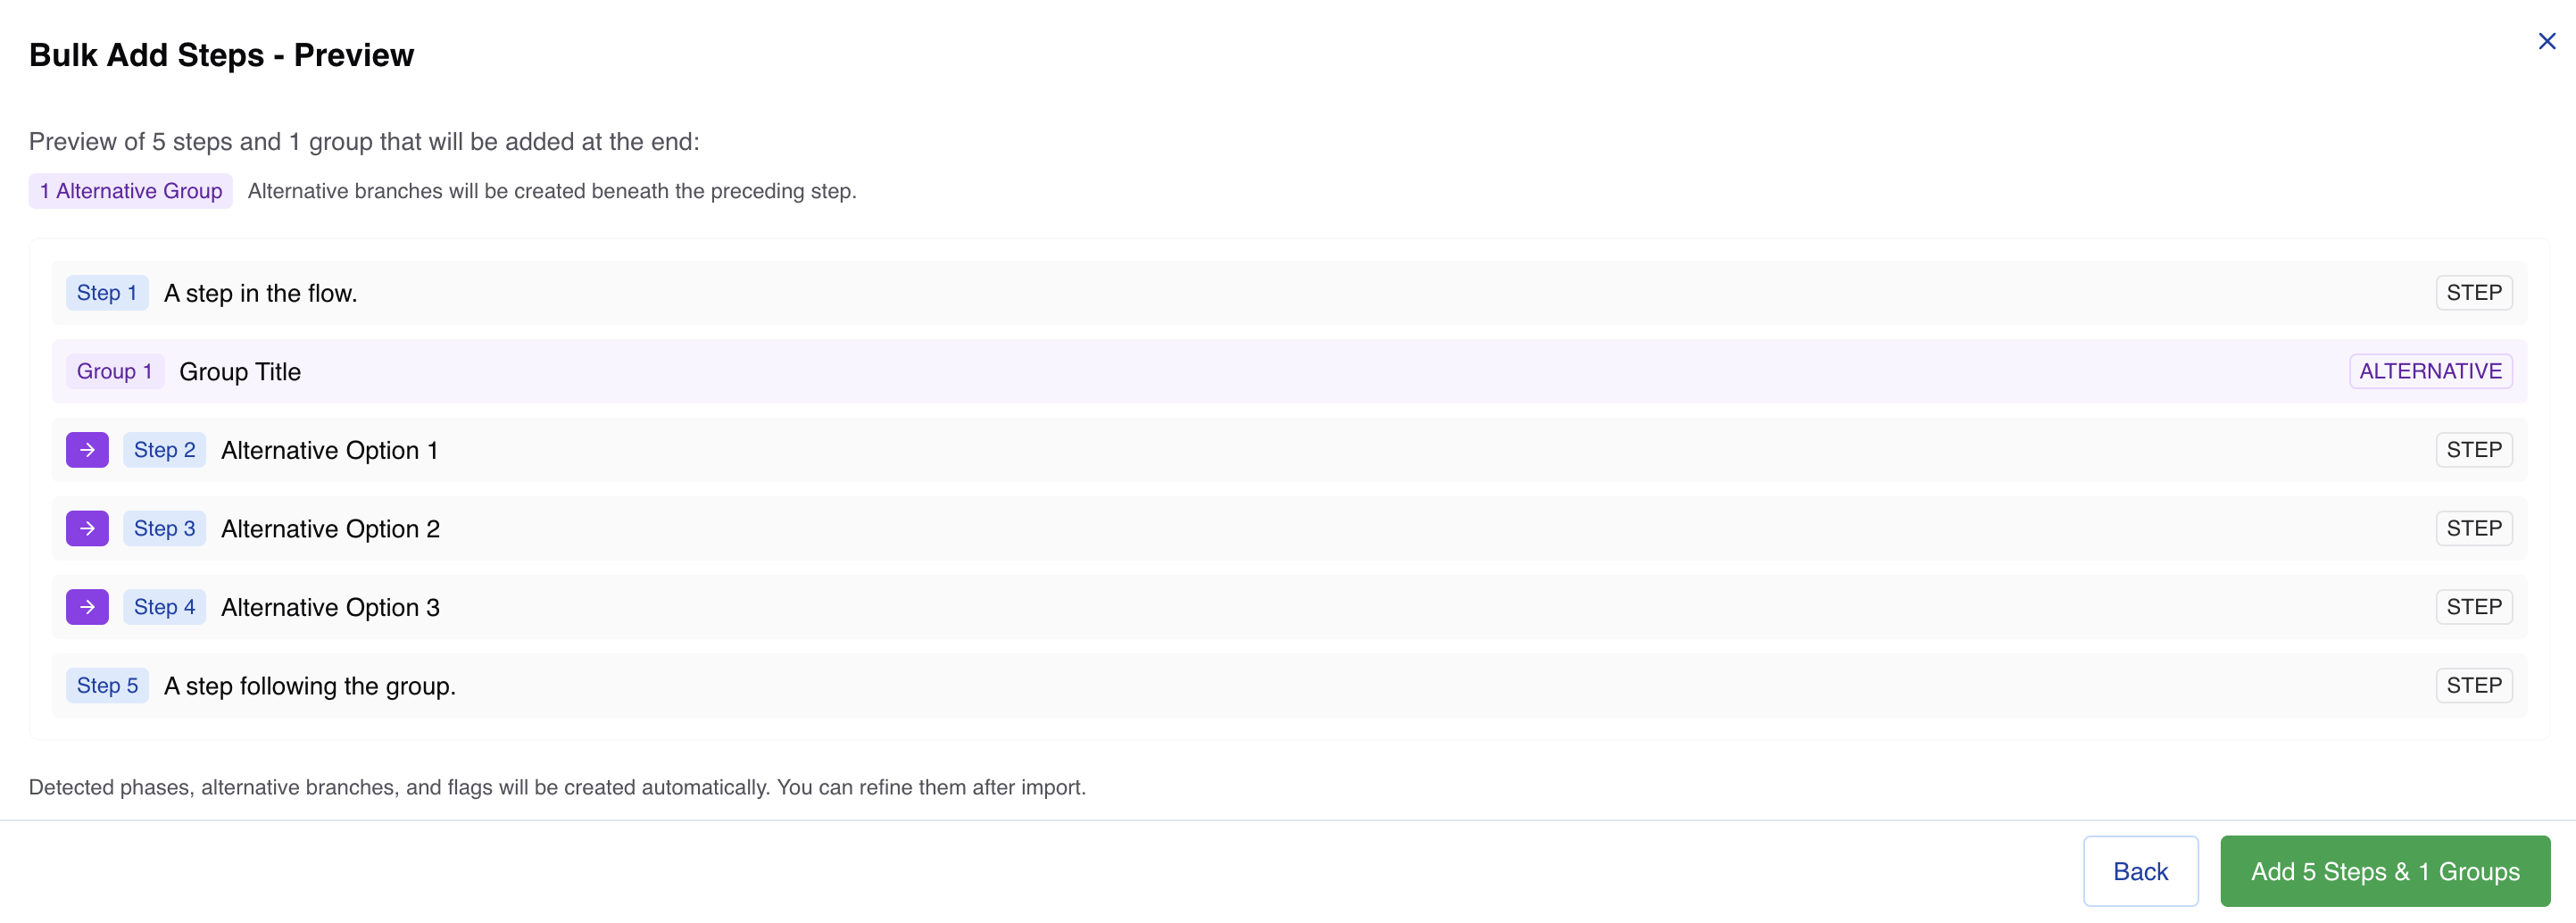
When adding subitems, there must always be a proceeding step that will serve as the group heading. For example, this is not allowed:
- Not Valid Alternative Option 1
- Not Valid Alternative Option 2
- Not Valid Alternative Option 3
Rules for Alternative Branches:
- Alternatives must follow a primary step (non-alternative, non-phase step)
- All consecutive lines starting with
-are grouped together - The group heading is assigned to the most recent primary step
- Once a non-hyphenated line appears, the group closes
- A new primary step can have its own alternative group
Flagging Steps
Flags provide visual indicators to mark steps that need attention or have special status. Add flags at the beginning of any step title. There are many flags and dispositions in the Cambigo editor, but currently support is for the Review flag and the New flag.
Available Flags:
| Flag | Syntax | Purpose |
|---|---|---|
| Review | [R] | Marks steps that need review or verification |
| New | [N] | Marks newly added steps or features |
Bulk Add Syntax: [FLAG] Step Title
Example:
Collect patient information
[R] Verify insurance eligibility
Schedule appointment
[N] Send SMS reminder
Send confirmation email
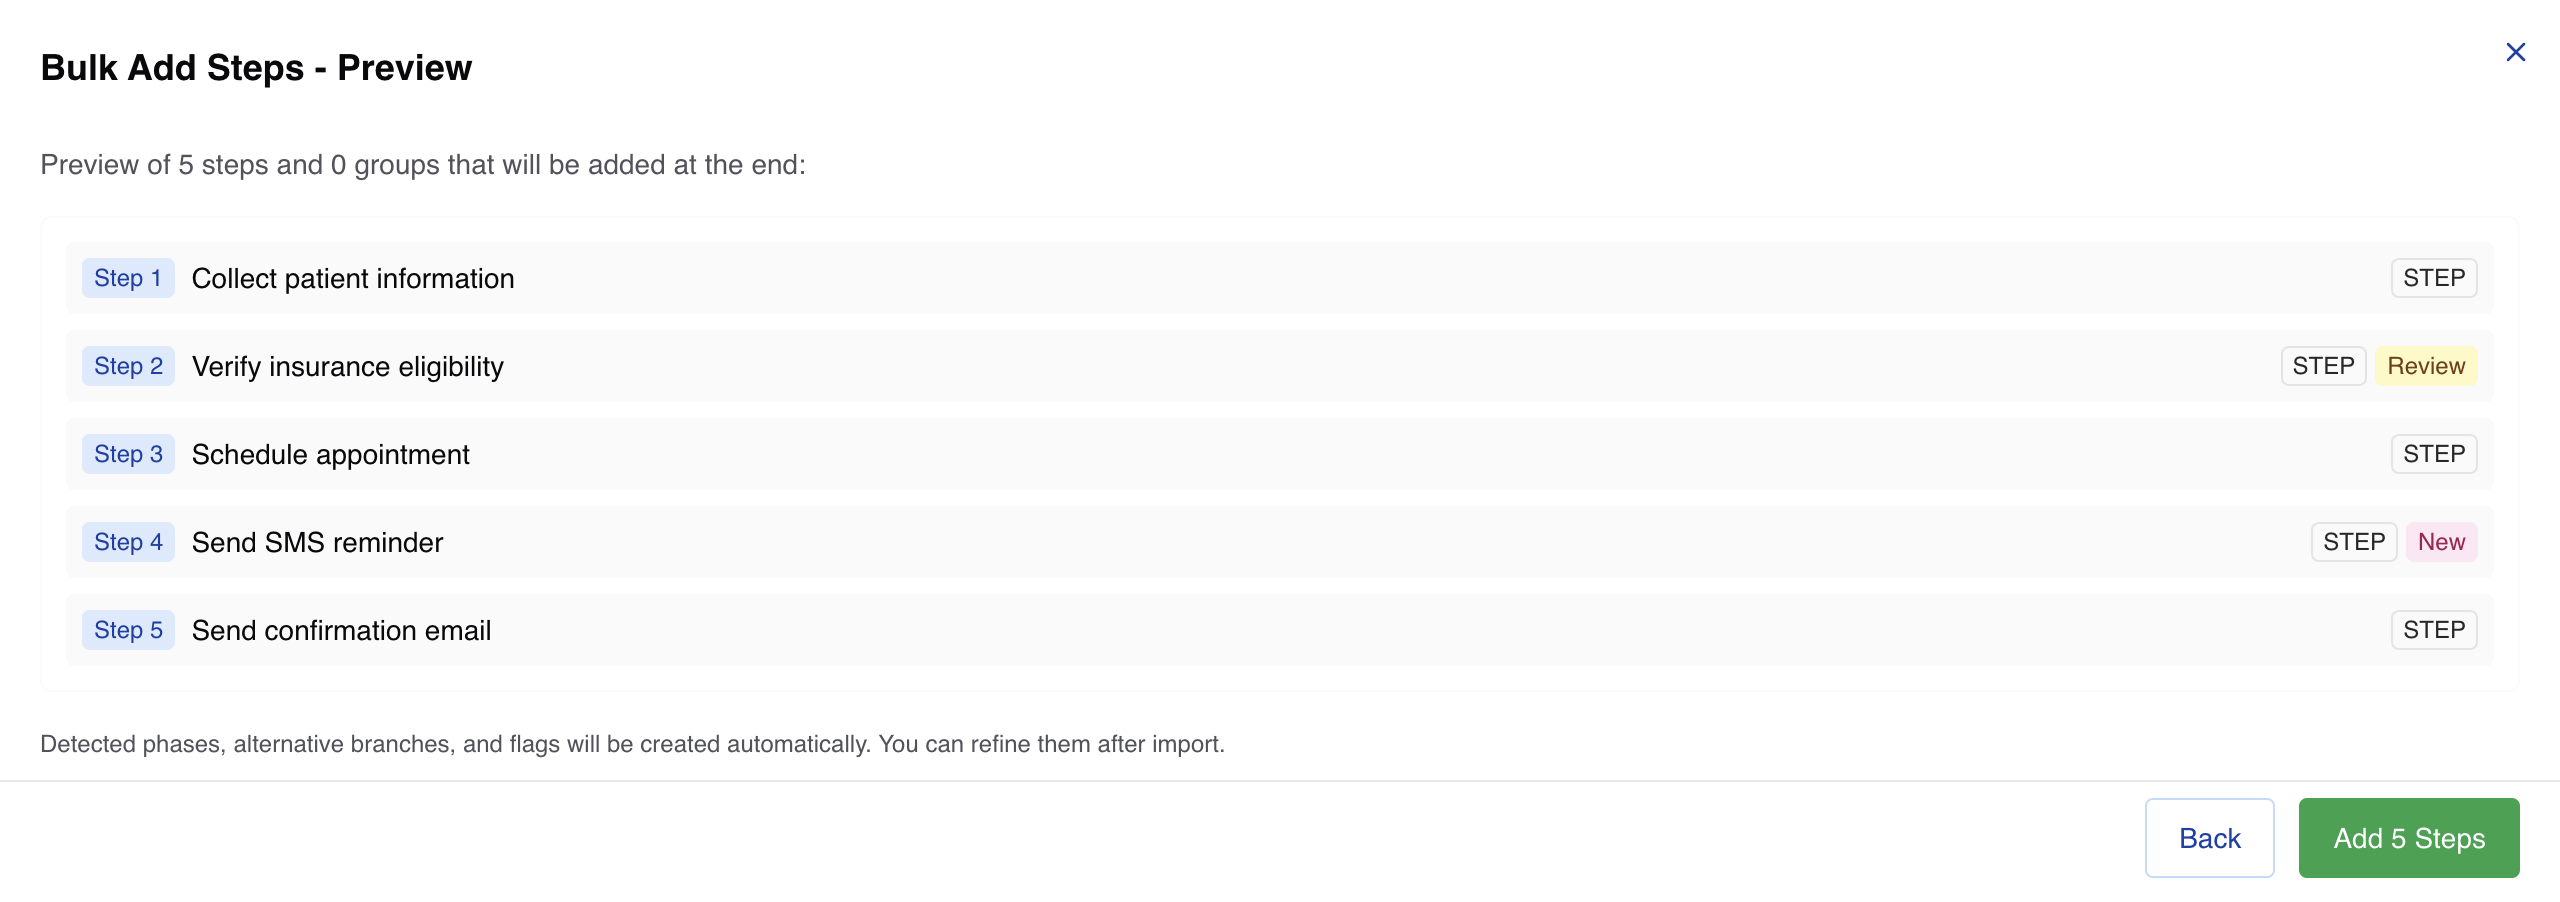
Combining Flags:
You can use multiple flags on a single step:
[R][N] Implement new security protocol
Flags can be combined with alternatives and phases:
# Security Phase
[R] Configure firewall rules
Authentication:
- [N] Biometric scan
- Password entry
- [R] Two-factor authentication
Insertion Position
By default, new steps are added at the end of your flow. You can change this by selecting an insertion point.
Insert After a Specific Step
- In the Bulk Add drawer, click the Insert after dropdown
- Search for a step by typing in the search box
- Select the step after which you want to insert new steps
- The preview will show where steps will be inserted
Parent Group Inheritance:
If the selected step belongs to a group (alternative branch), all new top-level steps will automatically inherit the same parent group. This maintains the logical structure of your workflow.
Insert at End (Default)
Select "Insert at end" or leave the dropdown at its default to add steps to the end of your flow.
Complete Examples
Example 1: Customer Onboarding Process
# Discovery Phase
Initial contact with customer
[R] Qualify lead
Schedule demo

# Proposal Phase
Prepare proposal
[R] Review pricing
Send proposal to customer

# Contract Phase
[N] Digital signature setup
Contract Signing Method:
- Electronic signature
- Physical signature
- Notarized signature
Process payment
Welcome customer
This creates:
- 3 phases (Discovery, Proposal, Contract)
- 10 steps total
- 2 steps flagged for review (
[R]) - 1 step marked as new (
[N]) - 1 group with 3 alternative branches (signing methods)
Example 2: Software Development Workflow
# Requirements
Gather requirements
[R] Review with stakeholders
Create user stories

# Development
Setup development environment
Coding Standards:
- [N] Automated linting
- Manual code review
- Peer programming
Write code
[R] Unit testing

# Deployment
Create release branch
[N] Automated deployment pipeline
Deploy to staging
[R] QA testing
Deploy to production
This creates:
- 3 phases
- 12 steps total
- 3 steps flagged for review
- 2 steps marked as new
- 1 group with 3 alternative coding standard approaches
Example 3: Medical Appointment Workflow
Patient Registration
Collect patient information
Insurance Verification Method:
- [N] Automated verification
- Phone verification
- Manual form review

# Appointment
Check-in patient
[R] Verify patient identity
Vital signs collection
Doctor consultation

# Post-Visit
[R] Update patient records
Prescription Processing:
- Electronic prescription
- Paper prescription
Schedule follow-up
[N] Send satisfaction survey
This creates:
- 1 phase (Appointment)
- 11 steps total
- 2 steps flagged for review
- 2 steps marked as new
- 2 groups with alternatives (verification and prescription methods)
Preview and Validation
After entering your steps and clicking Next, you'll see a preview showing:
- Step count: Total number of steps and groups to be created
- Step numbering: Sequential numbering for easy reference
- Group indicators: Purple badges and arrows showing alternative branches
- Step badges: Visual indicators for phases vs. regular steps
- Flags: Review and new flags displayed as colored badges
- Insertion point: Confirmation of where steps will be inserted
- Parent group inheritance: Notice if steps will inherit a parent group
Review this preview carefully before clicking Add Steps to confirm.
Tips and Best Practices
-
Start with major steps: Begin by listing the main steps in your process, then add details and alternatives later
-
Use phases for complex workflows: For workflows with multiple themes or phases of work, use phase markers to create logical sections
-
Copy from existing documents: You can paste text directly from emails, documents, or web pages - each line becomes a step
-
Iterate progressively: Don't try to perfect everything in one session. Add major steps first, then refine with alternatives and flags in subsequent edits
-
Group related alternatives: Use the optional group title to make alternative branches more meaningful
-
Flag strategically: Use
[R]for steps that need review or verification and[N]for steps that represent newly added items. This is useful for adding to existing flows. -
Preview before adding: Always check the preview to ensure phases, groups, and flags are interpreted correctly
-
Edit after import: You can always refine steps, move them, or adjust groupings in the Flow Editor
Formatting Reference
Quick Syntax Guide
# Phase marker
Step title
[R] Review flag
[N] New flag
[R][N] Multiple flags
- Alternative option (must follow a regular step)
Group Title:
- Alternative 1
- Alternative 2
Character Rules
- Hyphens: Leading hyphens (with or without spaces) create alternatives
- Hash symbols: Leading
#creates a phase - Brackets:
[R]and[N]must be uppercase and at the start of the step - Colons: Optional in group titles; will be removed automatically
- Empty lines: Ignored (whitespace-only lines are skipped)
- Trimming: Leading and trailing whitespace is automatically removed
Limitations and Constraints
- Alternative branches must follow a primary (non-alternative, non-phase) step
- Only
[R]and[N]flags are currently supported - Group titles must appear on the line immediately before alternatives
- Phases cannot have alternative branches directly beneath them
- Maximum practical limit: While there's no hard limit, workflows with 100+ steps may be better split into multiple flows.
Related Features
- Step Editor: After bulk adding steps, use the flow editor to add descriptions, notes, and other metadata
Troubleshooting
Q: My alternatives aren't grouping together
A: Ensure the alternative lines (starting with -) immediately follow a primary step with no blank lines in between.
Q: The group title isn't appearing
A: Make sure the title line immediately precedes the first - alternative, with no blank lines.
Q: Flags aren't being recognized
A: Flags must be uppercase ([R] not [r]) and must appear at the very beginning of the line before any other text.
Q: My phase isn't showing as a phase
A: Ensure the # is the very first character on the line with no spaces before it.
Q: Steps are going to the wrong location
A: Check the "Insert after" dropdown - it may be set to a specific step instead of "Insert at end".